• Die Forumsregeln und Nutzungsbedingungen findet ihr in der Navbar unter Impressum !
    Bitte unbedingt beachten!
    Wie überall im Leben gibt es Spielregeln, so auch hier!
    Die Datenschutzerklärung zum DSGVO findet ihr ebenfalls in der Navbar unter Datenschutzerklärung !
    Hinweis nach DSGVO :
    Es ist hier keinerlei Angabe erforderlich. Alle Angaben in diesem Bereich sind öffentlich sichtbar und werden freiwillig gemacht. Mit einem Eintrag in diesem Bereich erkenne ich dieses an, und bestätige die Datenschutzerklärung zur DSGVO für das Forum gelesen zu haben.

    Danke

Bruder-Umbau Wheeled excavator CAT M318

Hello Luca,

this is the first nightmare I see with a happy ending. Your painting finally turned out great.
And imho the blue fits better than the usual CAT yellow.
To be honest, my painting skills are much worse than yours...

Greetings,
Franz
 
Hi Luca,
with this Model, a great Job you have done. :like

And the Blue Color fits very good :ok

:winker
 
Dashboard for OpenTx (LUA script)

Recently I bought a new radio, to use along with my Taranis: a radiomaster Tx16s with its receiver R168 (that has battery pin to read LiPo voltage up to 4s).
This radio has a graphic color display and can be enhanced using LUA scripts. This allow for customized active screens with graphics, telemetry and some fancy icons.

So I wrote a small script which shows which part of the excavator is in use by the sticks (wheels or arm), the battery level (disguised as fule level) and pump regime (taken from the pump output channel).

It turned out quite nice and useful, especially the possibility to see graphically the battery level is great :)
I used the BATT pin on the R168 receiver to read battery level from the LiPo and sen it to the radio as standard RxBt value (on Taranis receivers it is the receiver voltage level, usually fixex 5V).

Here is my new radio with the excavator. Pump is running at low regime (no cylinder active for mixes) and battery is charged (though not full)

tx16s_cat_widget.jpg


I am still making some mods to the script (I am trying to make it customizable to be used with various machinery)

Here is the latest version with smaller icon (it also allows for axle lockers, if present in the model) and dark background.

CatM318_LUA_script_wheels.png

CatM318_LUA_script_arm.png

In this last picture, the arm is active along with wheels motor and steering which control is moved to lateral sliders (to help with the arm in case the excavator gets stuck). Since these sliders do not keep their center position I set a visual (red highlight) and acustic alarm when this mode is in use.

CatM318_LUA_script_wh_arm.png


When battery level is OK the fuel warning lamp turns off.

CatM318_LUA_script_battery_full.png


Just in case someone could be interested to try it, here can be found a beta release working and tested on my Tx16s. I also added instructions to configure (if present, like in wheel-loaders) the axle lockers.
LUA machinery dashboard on my GitHub
The script pictures can (of course) be changed to reproduce every model. Mode selection switch can be disabled and in this case only one bitmap can be used. Only limit is the name of the bitmaps that cannot be changed.
The script name can be changed (but you have to set its new name inside the script too) in order to have different configurations (different images, lockers, etc.) on the same radio. You rename a different widget for each model.


Luca

P.S. I made a similar script for my Taranis :

taranis_wh.jpeg

taranis_arm.jpeg

taranis_arm_wh.jpeg
 
WOW that´s nice.:like
Please tell us how much time you spend writing this skript.
How long does it need to get the skills programming a skript like yours.
I´m buliding a street sweeper and got a taranis X9E. I read a bit about lua script but I think im not able to write such a cool script, so i gave it up an try do use all the functions just with regular switches:heilig.
 
WOW that´s nice.:like
Thanks :)

Please tell us how much time you spend writing this skript.
How long does it need to get the skills programming a skript like yours.
Well, I work as a software developer so writing software comes quite natural to me in almost every language. I spent the most of the time creating the bitmaps and scaling them to fit in the small screen (especially the one of the Taranis). It took me a free afternoon to write and debug the script. But consider the fact that it is just a graphic script, it just shows graphically the values that are inside the radio.


I´m buliding a street sweeper
Do you have some pictures? It is a machine I always wanted to build but I was always dubious to where to start from. I though about converting a Bruder or starting a project from scratch.
It is extremely useful during big meetings where you have construction machinery (like dumpers, excavators...) spreading dirt everywhere on the streets.
A street sweeper would be VERY welcome :) I really need to build one :ok

I read a bit about lua script but I think im not able to write such a cool script, so i gave it up an try do use all the functions just with regular switches:heilig.
It is easier than it seems: try to start with a simple project, like the empty one of the OpenTx manual or the default BattCheck. Try to make simple things like writing a string or drawing an image. Then when it works add another thing. Then try to read inner values and write them on the screen. I did this way, and in few hours I had battery, pump and working mode displayed on the screen. At the beginning it was a rough dashboad, but little by little it turned out as in the pictures of the post above
To be honest, I use LUA script only for displaying values. I make everything else in the standard way, like you do, using mixes and switches. I tried to write a LUA mix script for the Pump, but at the end I preferred the standard one, so I gave up.

CatPumpMix.jpg

I only use a mix script (smooth channel)I found on the net that soften the steering making it more like a real heavy truck. I modified it a little because originally it was for drone camera. But with some adjustment it worked like a charm :) Now my trucks does not steer anymore like a racing car :hfg


Luca
 
Oscillating axle lock

It took me about the same time that I spent to project the whole excavator, to think/design/realize this single feature :frage
The chassis had no more free space and I did not know how to lock the oscillating axle without making something unrealistic (like locking always in center position) or aesthetically unacettable....

I though it over for months and eventually I decided do go to real way: two hydraulic pistons over the axle and an hydraulic valve to block the oil flux when needed. Of course space was tiny to non-existent and I never realized hydraulics in my life.... This is the reason it took me about one full year to realize this last part.

Once decided the design I started realizing the CAD project:

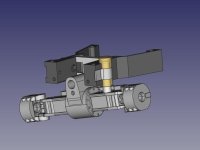
I found 12 mm of space between the chassis and the propeller shaft and I decided to use it for the valve and the actuator:
pendulum_lock_CAD_04.jpeg

Then I realized the pistons and the attach to the main frame (this part was really hard to design and at the end I had to compromise a little)
pendulum_lock_CAD_03.jpeg

pendulum_lock_CAD_02.jpeg

pendulum_lock_CAD_01.jpeg

The pistons have double O-ring and are made of chrome-plated ALU. Cylinders are 12 mm brass rods worked with lathe. Hydraulic connectors are 3mm from MAGOM.

The valve is actuated by an analog micro servo (EMAX ES08MA II) and is made of four parts: body, O-ring retainer, shaft and servo coupler:
pendulum_lock_CAD_05.jpeg

I decided to use a compensating tank (first test showed that leakings are unavoidable :bl) so I needed a three way valve, ALL open and ALL closed. With axle unlocked it is possible to compensate leaking using the tank screw:
pendulum_lock_CAD_06.jpeg

The M3 screw moves ahead the piston and insert more oil in the circuit. The brass gear keep the screw in position. Once empty it can be removed from its position and refilled like a syringe.

At this point, with my small CNC router , my 3Dprinter and the lathe, I realized the parts:
IMG_20210927_120536.jpg

IMG_20210927_111939.jpg

IMG_20210927_111914.jpg

Realizing the valve was really difficult (for my reduced skills). There were a lot fo inside leaking and It did non work (initially) very well. I tried different approaches and materials and finally I found that brass body worked with a 5mm mill and stainless steel for the shaft worked best. I used 1.8mm O-ring of different diameters for everything this way I could use a lathe 2mm tool for every O-ring seat. The servo coupler was initially designed for CNC and made of brass/ALU. But the proto 3D part worked flawlessly so I decided to keep it and secure it with a 1.5mm rod.

After testing the whole lock for leaking I painted the new parts and mounted them on the chassis:
IMG_20211007_165732.jpg

IMG_20211007_165714.jpg

IMG_20211007_165641.jpg

IMG_20211007_145303.jpg

Everything worked more or less as expected ant FINALLY the axle does not collapse on the weight anymore :hfg

Last I realized the HMI Icon for my radio LUA script. Since I could not find anything in the CAD documentation I used a Volvo icon (Volvo wheeled excavators are really well documented on YouTube):
pendulum_lock_RADIO_01.jpeg

I updated the GitHub repo with the new parts, in case someone could be interested.

Luca72
 

Servonaut
Zurück
Oben Unten